Saturday, October 24, 2009

Painshill Grotto

Open for business this year. . .Painshill Grotto. Enjoy your Halloween festivities with us. Skel & Sons Grotto UnderKeepers.

Warning there are many pictures.
So Painshill Grotto is completed for this year. I say that so you will know that I plan on adding to it as the years go on.
Also. . .these pictures have been an excercise in my photography skills so please bare with me. I have just learned how to decrease the shutter speed to the point that I can take in the dark or low lighting pics. AND I used the tripod so I wouldn't wiggle while the shutter was open.

Here we go.

The Autumn side of the scene has been done for a while now. I have added the pile of leaves and the gate to the fence.


On the other side of the fence is the Halloween Carnival, we'll get to that next.


Note the Gate and the Tree.arrows pointing at them The tree is the favorite figure of Grandson Emery. He is only 2 and still he knows that the "man fell into the tree".


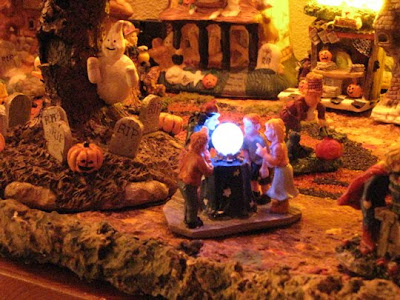
Now for the Carnival, this is taken in the actual lighting. So you see the Gypsy looking into her crystal ball. Someone selling pumpkins, Children bobbing for apples and of course all the ghosts are out in force. Note I have created a path and the plants along the front edge. You will also see the hillside to the Grotto in the background on the right side. and the beginning of the skull fence.



Now for the Grotto. This is actually in 7 pieces. So I can set it up with the sides open like a book. . .. or closed in this case. You view the Grotto from the front where there are two semi circle fences made with skulls. And a Scull Gate. Here are two pictures one is with Grotto lights OFF (I'll explain later)


And with Grotto Lights ON


The Grotto is painted with Glow in the Dark paint. So it has a slight yellowy/green cast to it in daylight and then at night looks like the pic above.
When I built the Grotto I used a box knowing I would be hiding small Rice Lights inside. I drilled holes in the "ceiling" of the Grotto and pushed the Rice lights through. They are Blue in color. Let me tell you this was a tedious task but I LOVE THE EFFECT.

OK. . .onto the Skull Fence. Our grape arbor was trimmed down for the winter (or should I say Jerry HACKED it down). After I got over my mad. . .I went out there and salvaged what few vines I could and let them dry. Some are old enough to have what appears to be BARK on them. Great texture.
I found at Rite-Aid a Skull Bracelet with plastic beads. They were 70% off. So I bought all 6 at 43 each. My only problem was the HOLE for the bead was in the top of the skull and I need them to be ear to ear. So out come the handy Dremel tool and I drilled them myself. I then used the florist wire I had handy and "Wove" the fence and glued it on to the semi circle mounds I created. Voila! Skull Fences.


Now for what is ontop of the Grotto.
Another Thrift store find that made me giggle all the way home was a replica of Haggrad's house in Harry Potter. It has changing lights and sound effects.
I also found at Rite-Aid at 70% off a garland of skeleton's. They are made of plastic and were "stiff". So I performed surgery and "un-stuck" them. I created some animated figures.
There is the Trumpet player ( I found an old brooch that was a trumpet and the scale was perfect.
The "Hear No Evil" "See No Evil" and "Speak No Evil" trio are all sitting on the cliff edge to the Grotto. As well as a hanging Skeleton.


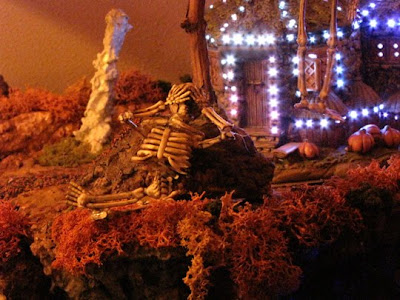


Now for the inside of the Grotto. At this time there is only one major figure in there. It is of a man climbing a spire while rats (arrows pointing at some of them) and a skeleton are around his feet. There is an open grave with a decaying body in it.
There are also some bones and gravestones around.
I hope to increase the inside of the Grotto next year with more scenes. But this is all I could do this year.
None of my pictures came out of the Hill that is to the right of the Grotto. But it looks good too. I just have to get those lights inside the houses to make it look great.

Here are pics of the whole thing in true light. There was a lot of effort and learnings in this project. Having never tried to Sculpt before I am surprised at my results. As well as the Landscaping.


It took me about 45 hours and $60 in supplies. But alot of the supplies are left over so I can make more. I am not including drying time. This had to be made in stages as I mentioned in previous blogs. I think doing it in Summer is a better idea. You can leave the segments outside to dry in the sun. I had to bake the smaller sections to get them dry enough to pain. The humidity was TERRIBLE.
Now. . . . pondering. . .do I have time to do the same thing for my Christmas village. . .


Thursday, October 22, 2009

I'm Falling

So I took the mail out to the mail box this am. There was fog everywhere and under the mail box was a beautiful spiderweb with dew drops on it. WOW. . .I need a picture of that. Ran back to the house got the camera and knelt in the street to take the pic. . .. along come my younger cat Shadow.
"Mommy. . .whatcha doooin'"
"Go away"
"but whatcha dooin'?"
"GO AWAY in are in the shot"

"NO NO NO . . . . "
She wrapped around the post and her tail went up in the air. . . and tore the beautiful web. Damn

Well, since I am out here I might as well take advantage of the dewdrops. So I went on a foto safari.


My favorite

Wednesday, October 21, 2009

Now for something different

At least once a week I visit a thrift store. Could be Goodwill, or Value Village, or some one of a kind store owned locally. Especially during the halloween season I pay visits to my haunts.
Yesterday it paid off.
Yes I look for costumes or parts of costumes. But yesterday I yanked from a hanger an item that was 90+ years old. Ok. . .I get to brag for a moment. I know my fashion, I could tell immediately that the wool dress with the Pinned on collar was very old compared to the nylon monstrosities it was hanging next to.
Yes the wool had some small moth holes in it. But the structure was VERY sound. The pins in the collar and the belt are original. All the snap closures are in very good condition.
With $4.99 I took this lovely home. And after my easy research. . thanks to my full bookcase of fashion books, I can prove the era of it.
Below are the photos and documentation to date the dress. Obviously it is a teen's dress or a maids dress. 1919 made with wool and a cotton collar. This era used buttons as a cost effective embellishment. The collar as white work on it. Simple, servicable, and sturdy.


This dress will now be part of my collection. I have only one other item of that era (world war 1).
I love treasure hunting especially when I am surprised at the gems I find and where I find them.

Sunday, October 18, 2009

Phase 3 adding foilage

Phase one is building the platforms. In my previous blog I showed the hill I created with Sculptamold. Unfortunately I did not make the level areas VERY level so my houses will be on the slant. That works find for the halloween village. but when I build the Winter scene I will have to make a concerted effort to make everything level.


So 4 platforms are finished with the Phase 1. As well as the hill and the Grotto. I have made more mistakes trying to build the grotto. Note to self: watch out how heavy these pieces get. I had to build the grotto with a box core so I could drill holes in the "ceiling" and be able to add the rice lights (battery powered) and store all the wiring and battery inside. Now the Grotto is very heavy compared to the hill.


Phase 2 is the painting. I have already shown platform one in it's painted phase. Platform two and Hill are also painted now.

Phase 3 is adding foilage & Paths. This has been a much more rewarding stage. The foilage comes in packages of colors or green. All of it is made out of sponges. Yes the creatures that grow in the ocean. Some of them are really weird to handle. I rip them apart to create smaller bushes. As I rip them I keep thinking about pulling apart an animal. ewwww. Gotta keep that vision out of my mind.


Here I have put a line of shrubs along the fense line. As well as made some of the GREEN trees that comes with the kit. They are OK for this side of the scene but they are very green. I am going to keep them for the Easter village next year.

I chopped up some of the vines from my grapes in the backyard. The vines are drying out now and have some very unique shapes. I combined them to make a gate for the fence. I am rather proud of how it turned out. Wait till you see the graveyard fence I made with them. I REALLY like it. . .I will have it completed for the next blog entry.


Here we have a view of the path. This gravel is reddish here but slowly turns to black as it gets closer to the graveyard. The gravel is sprinkled onto glue, let dry. Then go back and with an eyedropper put watered down glue on top. It flows into the cracks and creates a sealant that keeps the gravel from coming loose as you move the platform or structures.


My hill and the tilting houses.


Yup, I think I am really enjoying this miniature work. I know that some people will not understand the grotto and the graveyard part. Yet it is very much a part of my whole creative side. I often wonder if I had grown up in the 1990's instead of the 1960's I think I would have totally been a Goth girl.

Thursday, October 15, 2009

Preparing for Halloween


Now that the warning is out of the way I can start on my new project.
Painshill Grotto. This place actually exists in Surrey England. But I am taking artistic license with the appearance of it.
Start with some Sculptamold. Mix water and start slathering it onto newspaper or styrofoam shapes.


Let it dry for 3+ days. Rip out the insides and you have a hollow hill.
This stuff is used by model train enthusiasts. So they can make those huge hills and tunnels for the trains. You can sand this, drill it, paint it, glue it and it doesn't chip or split.


Then you start painting it.

Here we have a piece almost done. This is the calm country scene for the fall.


The rock fence is part of the ground. The sculptamold is the ground and fence. the figures are store bought. I still have to put in the shrubs and other trees as well as the gravel on the pathway. The whole thing will have felt under it so it won't scratch the wood. I have a pile of miniature leaves to still create for under the trees.

Here is where Painshill Grotto is located. Note the left side is painted but not completed. The right side is still missing the grotto and the water feature. It is just a white field and a white hill right now. The whole scene should show a normal fall farm on the far left and gradually change to a grotto graveyard and cliffside to the right.
Tonight I will work on the middle section.